Microgreens have moved from niche restaurant garnish to mainstream superfood and high-margin urban farming opportunity. They sit at the intersection of three trends — interest in nutrient-dense food, the rise of indoor farming, and the search for low-capital home businesses — which is why a single 10x20 grow tray can return 8–15x its input cost in under two weeks. This guide covers everything you need to understand, grow, eat, buy, and sell microgreens, plus the realities of running a microgreens business in 2026.
Whether you want to add the most nutrient-dense food on the planet to your own diet, supply a few local restaurants from your spare room, or build a scalable indoor farm, the fundamentals are the same. Master them and microgreens become one of the most rewarding small-footprint crops you can grow.
What Are Microgreens
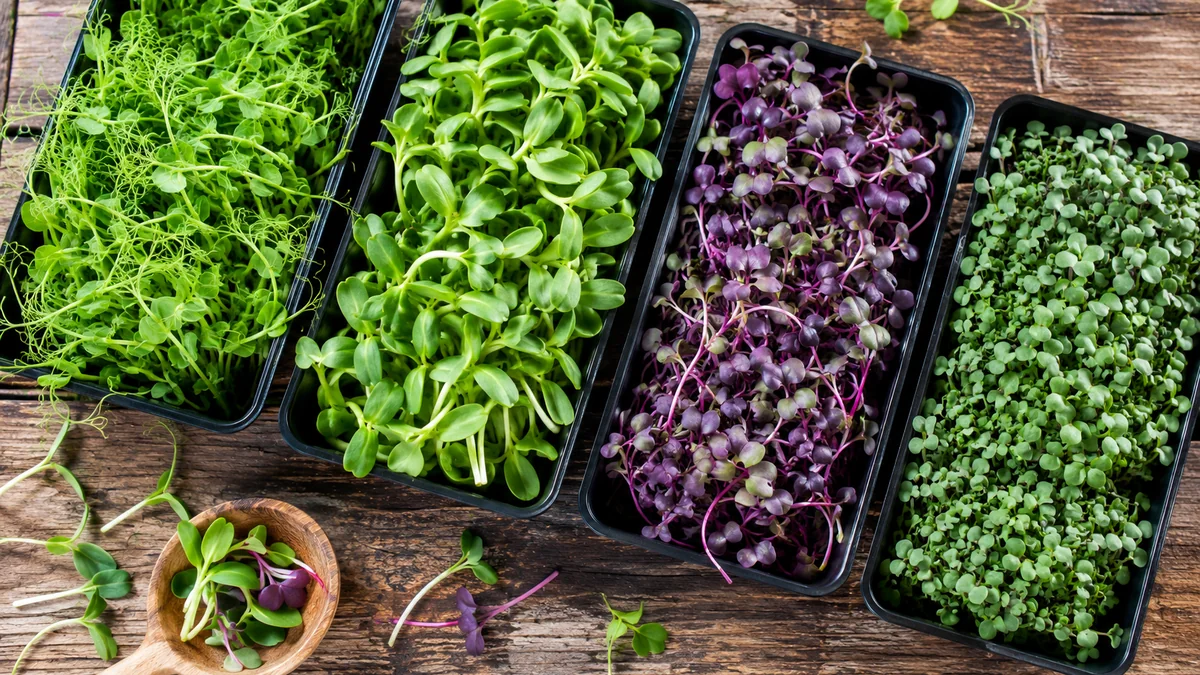
Microgreens are young edible plants harvested 7 to 21 days after germination, once the first true leaves (called cotyledons in some species) have developed. They are bigger than sprouts but smaller than baby greens, typically measuring 1 to 3 inches tall when cut. Almost any edible vegetable, herb, or grain can be grown as a microgreen — there are over 80 commercially viable varieties — but a small set of crops dominates because of their speed, yield, and flavor.
Microgreens vs Sprouts vs Baby Greens
| Feature | Sprouts | Microgreens | Baby Greens |
|---|---|---|---|
| Growth medium | Water only | Soil or hydroponic mat | Soil |
| Days to harvest | 3–7 days | 7–21 days | 21–40 days |
| Parts eaten | Seed + root + stem | Stem + leaves only | Leaves only |
| Light needed | None | Yes (after germination) | Yes |
| Food safety risk | Higher (warm, wet) | Lower | Lower |
| Flavor intensity | Mild | Very intense | Moderate |
Most Popular Microgreen Varieties
| Variety | Days to Harvest | Flavor | Yield per 10x20 Tray | Difficulty |
|---|---|---|---|---|
| Pea Shoots | 8–12 | Sweet, fresh pea | 300–500 g | Beginner |
| Sunflower | 8–12 | Nutty, crunchy | 300–450 g | Beginner |
| Radish (Daikon, China Rose) | 6–10 | Peppery, spicy | 180–250 g | Beginner |
| Broccoli | 10–14 | Mild, fresh | 150–220 g | Beginner |
| Kale | 10–14 | Earthy, mild | 120–180 g | Intermediate |
| Red Cabbage | 10–14 | Sweet, mild | 140–200 g | Intermediate |
| Cilantro | 18–25 | Bright, citrusy | 100–150 g | Advanced |
| Basil | 16–22 | Intensely aromatic | 80–120 g | Advanced |
| Amaranth | 10–14 | Mild, earthy, colorful | 80–120 g | Advanced |
| Wasabi / Mustard | 8–12 | Sharp, hot | 120–180 g | Intermediate |
Health Benefits and Nutrient Profile
The reason microgreens have grown beyond gourmet kitchens into wellness routines is straightforward: gram for gram, they are among the most nutrient-dense foods you can eat. A 2012 USDA study tested 25 commercially grown microgreens and found that most contained 4 to 40 times higher concentrations of vitamins, antioxidants, and phytonutrients than their mature counterparts.
Key Nutritional Highlights
| Microgreen | Standout Nutrient | Vs Mature Plant | Health Benefit |
|---|---|---|---|
| Broccoli | Sulforaphane | ~100x more | Anticancer compound, detoxification support |
| Red Cabbage | Vitamin E, polyphenols | ~40x more vitamin E | Antioxidant, cardiovascular protection |
| Cilantro | Beta-carotene, vitamin K | ~3x more | Vision health, bone health |
| Sunflower | Plant protein, complete amino acids | Significantly higher | Muscle repair, satiety |
| Pea Shoots | Folate, vitamin C, iron | ~7x more vitamin C | Immune support, energy |
| Radish | Glucosinolates, vitamin K | ~6x more | Liver function, inflammation |
| Kale | Lutein, zeaxanthin | ~4x more | Eye health, macular protection |
Other Documented Benefits
- Blood sugar regulation — A 2019 study in Nutrients found that fenugreek microgreens improved insulin sensitivity in people with type 2 diabetes when added to meals daily for 8 weeks.
- Heart health — Red cabbage microgreens lowered LDL cholesterol and triglycerides in animal models on a high-fat diet, with effects attributed to their high anthocyanin content.
- Inflammation reduction — Sulforaphane in broccoli microgreens activates the Nrf2 pathway, the body's master antioxidant switch, with documented anti-inflammatory effects.
- Digestion and gut health — Microgreens are concentrated sources of fiber and live enzymes relative to their weight, supporting healthy digestion when eaten raw.
- Weight management — High nutrient density per calorie makes microgreens an effective addition to calorie-restricted diets without sacrificing micronutrient intake.
Are Microgreens Safe?
Yes, when grown and handled properly. Unlike sprouts, which are eaten with the seed and root and have been linked to occasional E. coli or salmonella outbreaks, microgreens are cut above the soil line and only the stem and leaves are consumed. The risk profile is similar to other leafy greens like spinach or lettuce. Standard precautions — clean water, sanitized trays, and washing greens before eating — keep contamination risk minimal.
How to Grow Microgreens (Step by Step)
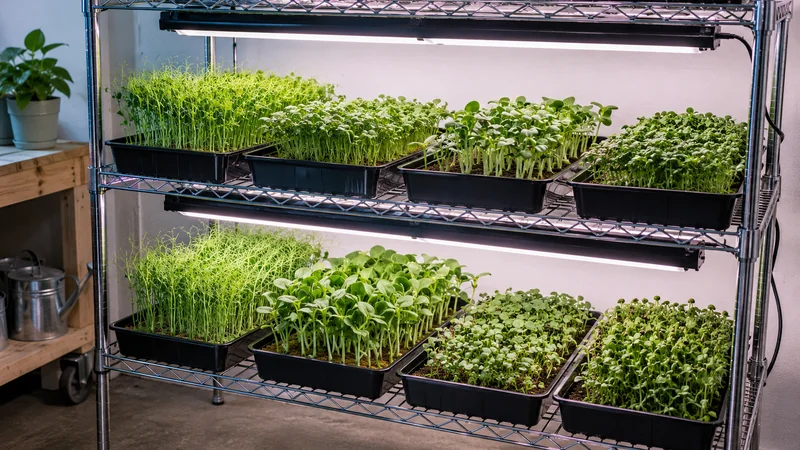
You don't need a greenhouse or specialized equipment. A spare countertop, basic supplies, and 10 minutes a day are enough to grow several trays at home. Here is the workflow that works for both home growers and small commercial operations.
What You Need to Start
| Item | Purpose | Approximate Cost |
|---|---|---|
| 10x20 inch grow trays (with and without drainage holes) | Growing container + bottom-watering reservoir | $3–8 per pair |
| Growing medium (soilless mix, coco coir, or hemp mat) | Holds moisture and supports root growth | $15–25 per cubic foot |
| Seeds (untreated, food-grade) | Varies by crop; buy in 1–5 lb bags for volume | $8–25 per lb |
| Grow lights (T5 fluorescent or LED, 6500K) | Photosynthesis after germination | $30–80 per shelf |
| Spray bottle / watering can | Surface misting during germination | $5 |
| Sharp scissors or harvesting knife | Clean cuts at harvest | $8–20 |
| Clamshell containers or vented bags | Storage and sale packaging | $0.15–0.40 per unit |
Step 1: Soak the Seeds (for Larger Seeds Only)
Soak peas, sunflower, beet, and chickpea seeds in clean water for 8–12 hours before planting. This kick-starts germination and improves uniformity. Small seeds like broccoli, radish, kale, and amaranth do not need soaking.
Step 2: Prepare the Tray
Fill your 10x20 tray with 1 to 1.5 inches of pre-moistened growing medium. The medium should feel like a wrung-out sponge — moist but not dripping. Level the surface with your hand or a piece of cardboard so seeds make even contact.
Step 3: Seed Densely and Evenly
Microgreens are seeded much more densely than mature vegetables — the goal is a near-carpet of seedlings. Typical seeding rates: pea and sunflower 200–250 g per 10x20 tray, broccoli/kale/radish 15–25 g per tray, basil and cilantro 10–15 g per tray. Spread by hand or a shaker for even coverage.
Step 4: Blackout / Germination Phase
Cover the seeded tray with another tray (inverted) or a blackout dome. This creates darkness and humidity, which most seeds need to germinate, and pressure that encourages roots to dig in. Keep at 65–75°F (18–24°C). Mist once or twice daily to keep the surface moist. Germination takes 2–4 days for most crops.
Step 5: Light Phase
Once seedlings push the cover up half an inch (or the radicles are well established), uncover and move under grow lights. Provide 12–16 hours of light per day, kept 4–8 inches above the canopy. Switch to bottom-watering — pour water into a tray without drainage holes that the grow tray sits in, so roots draw moisture up and leaves stay dry. This prevents most mold problems.
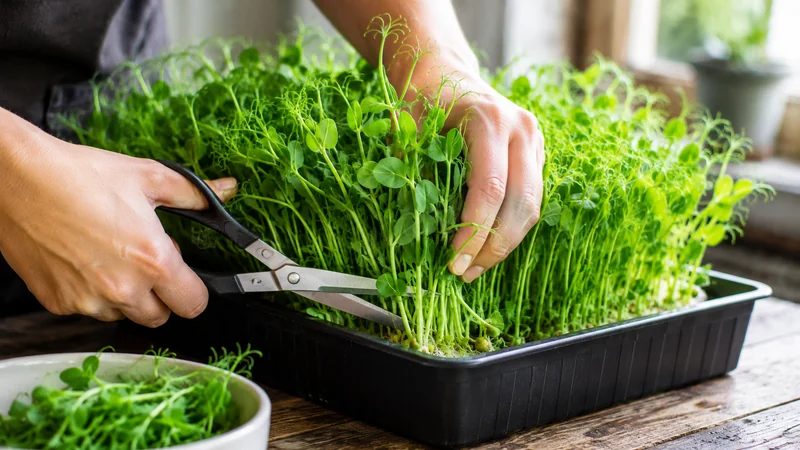
Step 6: Harvest
When the first true leaves appear (or for some crops, when cotyledons are fully open), the greens are ready. Cut just above the soil line with sharp scissors or a harvesting knife. Do not water for 4–6 hours before harvest — dry greens last much longer in storage.
Step 7: Clean, Package, Refrigerate
Inspect for any yellow or damaged leaves and remove. Most commercial growers do not wash microgreens for restaurants (they wash at use), but home consumers prefer rinsed product. Pack into clamshells lined with a paper towel to absorb moisture and refrigerate at 35–40°F immediately.
Common Growing Mistakes to Avoid
- Overwatering is the single biggest killer of beginner trays. Wet leaves invite mold and damping-off disease. Bottom-water once light phase starts.
- Poor airflow traps humidity and breeds fungus. A small clip fan running 24/7 in the grow area solves 90% of mold issues.
- Cheap or treated seeds have low germination and may carry chemicals. Always buy from microgreen-specific seed suppliers like True Leaf Market, Johnny's Seeds, or Mumm's Sprouting Seeds.
- Inconsistent temperature — swings outside 60–80°F slow germination, cause uneven growth, and can trigger mold.
- Skipping the blackout phase for crops that need it leads to weak, leggy stems that fall over.
How to Consume Microgreens
Microgreens are meant to be eaten raw or added at the very end of cooking — heat destroys most of the enzymes, vitamin C, and many antioxidants that give them their nutrient advantage. A small handful (about 20–30 grams) added to meals daily is enough to noticeably bump nutrient intake.
Best Daily Uses
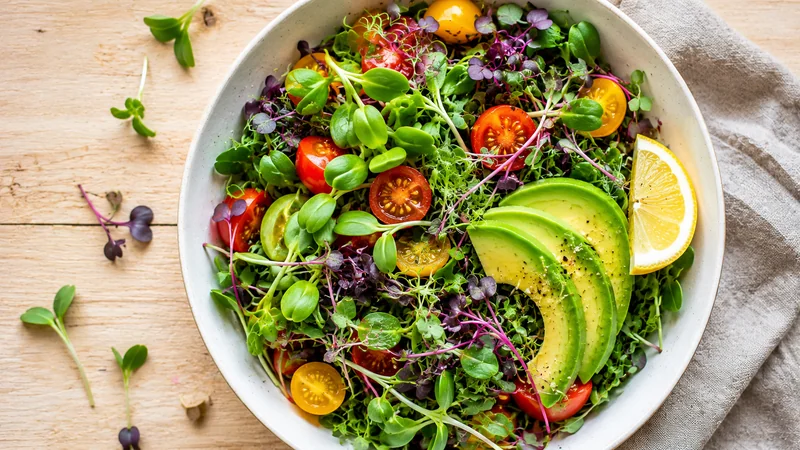
- Salads — Use as the entire greens base or mix with regular lettuce for an upgraded version.
- Sandwiches, wraps, burgers — Layer instead of (or with) lettuce. Pea shoots and sunflower add crunch; radish and mustard add bite.
- Smoothies — A handful of broccoli or kale microgreens blends well with fruit, adding nutrients without strong flavor.
- Eggs — Top scrambled eggs, omelets, or avocado toast right before serving.
- Soups and pasta — Garnish just before eating. The heat from the dish slightly wilts the greens without destroying nutrients.
- Pesto and dressings — Basil, cilantro, and arugula microgreens make intensely flavored sauces.
- Pizza topping — Add after baking. Restaurants charge premium for pizzas finished with microgreens.
- Sushi and rolls — Radish, daikon, and mustard microgreens are common in modern sushi preparation.
How Much to Eat
There is no official RDA for microgreens, but most nutritionists recommend 25–50 grams (a small handful) several times per week as part of an otherwise diverse diet. They are a complement to mature vegetables, not a replacement — variety still matters.
Storage Tips for Consumers
- Keep microgreens in their original clamshell or a sealed container with a dry paper towel.
- Refrigerate at 35–40°F (2–4°C). Do not freeze — they will turn mushy.
- Use within 7–10 days of purchase for best flavor and texture.
- Buy "living" microgreens (sold with the tray) if you want maximum freshness — harvest with scissors right before use.
Where to Buy Microgreens
Microgreens are no longer a hard-to-find specialty product. Most US, UK, EU, and Indian metro markets have several options across price points.
Best Places to Buy
| Source | Price Range | Freshness | Variety | Best For |
|---|---|---|---|---|
| Local microgreens farmer (direct) | $3–8 per 2 oz clamshell | Excellent (1–3 days from harvest) | Limited but rotating | Best quality, supporting local |
| Farmers' markets | $4–10 per clamshell | Excellent | Wide | Trying varieties before buying online |
| Specialty grocery (Whole Foods, Sprouts) | $5–12 per package | Good (3–7 days) | Wide | Convenience |
| Local grocery stores | $4–8 per package | Variable | Limited (mostly pea, sunflower, mixed) | Everyday access |
| Online direct-to-consumer | $8–20 per pack + shipping | Good (2–4 days transit) | Widest | Specialty varieties |
| Restaurants and supper clubs | Included in dish price | Excellent | Chef's choice | Tasting before committing |
What to Look For Before Buying
- Bright, vibrant color — pale or yellowed greens are past their prime.
- Crisp, upright stems — wilted or matted greens have been stored too long.
- No condensation or moisture in the package — wet greens spoil fast.
- Clean cut — short stem remnants suggest fresh harvest, long stems with browning ends suggest age.
- Smell — should smell fresh and grassy. Any sour or musty smell means contamination.
- Harvest date — many local growers print this; ideal is within the past 3–5 days.
How to Sell Microgreens
The economics of selling microgreens are unusually favorable because of three things: short crop cycles (8–14 days vs 60–90 for mature vegetables), high price per pound ($20–40 wholesale, $40–80 retail), and low transportation cost in localized models. The trade-off is that they are perishable and labor-intensive, so getting your sales channels right is more important than scaling production.
The Four Main Sales Channels
| Channel | Typical Margin | Volume | Effort | Best For |
|---|---|---|---|---|
| Restaurants (direct wholesale) | 60–70% | Medium–High (10–50 lb/week per account) | Medium (delivery, relationships) | Steady recurring revenue |
| Farmers' markets | 75–85% | Low–Medium (10–30 lb per market day) | High (booth setup, weekly time commitment) | Brand building, customer feedback |
| CSA / subscription box | 70–80% | Predictable (set per subscriber) | Medium (delivery routes) | Recurring direct-to-consumer |
| Grocery / retail wholesale | 30–45% | High (50–200 lb/week per store) | Low ongoing, High setup (compliance, packaging) | Scale, less labor per unit |
Restaurant Sales: The Highest-Value Account
A single mid-size restaurant typically orders 5–20 pounds of mixed microgreens per week at $20–35 per pound wholesale, which is $400–2,800 monthly per account. Chefs are usually open to a sample drop-off — bring a clamshell of pea shoots, sunflower, and radish microgreens, leave a price list, and follow up in 3 days. Reliability matters more than variety: a grower who delivers on time every week will beat a grower with more SKUs but inconsistent fulfillment.
Approach steakhouses, sushi restaurants, farm-to-table concepts, salad-focused chains, and any kitchen with a tasting menu. Avoid large chain restaurants — they require corporate supplier approval that takes months and rarely justifies the volume.
Farmers' Market Sales: Brand and Margin
Farmers' markets give you 75–85% margins and direct customer feedback. Expect to sell 80–200 clamshells per market day at $4–8 each. Tips that consistently work:
- Bring at least one "living" tray — customers love seeing the greens growing and cut to order.
- Offer samples with toothpicks. People buy what they have tasted.
- Sell mixed clamshells at a premium ($1 more) — they sell better than single-variety packs.
- Build a subscriber list with a clipboard at the booth — convert market customers to weekly delivery.
Online and Subscription Sales
A simple weekly subscription model (one or two clamshells delivered every Friday) is ideal for microgreens because production already runs on weekly cycles. Customers typically pay $25–50 monthly for two weekly clamshells. Use Shopify, Square, or a simple Google Form + payment link for under-50 subscribers. Local delivery within 10 miles is profitable; shipping farther usually isn't because of cold-chain logistics.
Pricing Examples (USD, 2026)
| Channel | Pea Shoots (per lb) | Sunflower (per lb) | Mixed Salad Mix (per lb) | Specialty (Wasabi, Amaranth) |
|---|---|---|---|---|
| Wholesale to restaurant | $18–24 | $20–25 | $22–28 | $40–55 |
| Wholesale to grocery | $14–18 | $16–20 | $18–22 | $30–40 |
| Direct retail (market / subscription) | $28–40 | $30–42 | $36–48 | $60–80 |
Starting a Microgreens Business
Microgreens are one of the lowest-barrier food businesses to start. A complete startup with capacity for 40 trays per week — enough to comfortably serve 3–5 restaurant accounts or a small farmers' market booth — costs $800 to $2,500 in equipment and supplies. The path to profitability is well-trodden and predictable.
Phased Launch Plan
| Phase | Duration | Goal | Output |
|---|---|---|---|
| Phase 1: Practice | 4–8 weeks | Master 3 reliable varieties (pea, sunflower, radish) | Consistent harvests, no mold failures |
| Phase 2: First Customers | Weeks 8–16 | Land 1–3 restaurants or 1 farmers' market | 10–20 trays/week, $400–1,200 monthly revenue |
| Phase 3: Process Optimization | Weeks 16–32 | Standardize seeding, watering, harvest schedules | 40–80 trays/week, $1,500–4,000 monthly |
| Phase 4: Scale | Month 8+ | Move to dedicated space, hire part-time help | 150–400 trays/week, $5,000–18,000 monthly |
Startup Cost Breakdown (40-tray Operation)
| Item | Cost |
|---|---|
| 4-shelf wire rack (x2) | $160 |
| T5 / LED grow lights (8 fixtures) | $280 |
| 10x20 trays (100 of each — drainage and reservoir) | $220 |
| Seeds (initial assortment for 6 varieties, 5 lb total) | $120 |
| Growing medium (soilless mix, 6 bags) | $110 |
| Packaging (500 clamshells + labels) | $160 |
| Watering / spray equipment, fans, timer | $90 |
| Sanitation supplies (food-safe sanitizer, brushes) | $50 |
| Refrigerator (used) | $200 |
| Licensing + insurance (varies by location) | $250–800 |
| Total starting capital | $1,640–2,390 |
Monthly Operating Economics (40 Trays / Week)
| Metric | Value |
|---|---|
| Trays produced per month | 160 |
| Average yield per tray | 180 g (0.4 lb) |
| Total monthly output | ~29 kg (64 lb) |
| Average wholesale price | $24 per lb |
| Gross revenue | $1,500–1,800 |
| Seeds, medium, packaging | $280–360 |
| Utilities (water, electricity) | $50–80 |
| Vehicle / delivery | $80–150 |
| Net profit (before labor) | $1,000–1,300 |
Requirements for a Microgreens Business
The compliance landscape varies dramatically by country and even by state or province. Below are the universal requirements followed by country-specific notes for the largest markets.
Universal Requirements
- Dedicated, sanitary grow space with washable surfaces, separate from personal living areas if selling commercially.
- Food-safe packaging labeled with product name, weight, harvest date, grower name, and address.
- Clean water source — most regulators require potable (drinking-quality) water for irrigation.
- Record-keeping — seed lot numbers, sow dates, harvest dates, and customer destinations. Required for traceability if a recall is ever needed.
- Sanitation protocol — written procedures for cleaning trays, tools, and surfaces between batches.
United States
- Cottage food laws in most states allow small-scale direct sales (under $20,000–50,000/year) at farmers' markets without commercial licensing, but rules vary.
- FSMA Produce Safety Rule (FDA) applies to operations selling more than $25,000/year, requiring documented practices around water, soil, worker hygiene, equipment, and animal exclusion.
- State Department of Agriculture license — required in most states for restaurant/wholesale sales. Inspection fees run $100–400 annually.
- Local health department approval for processing areas.
- Product liability insurance — $500–1,500/year for $1M coverage, often required by restaurant and grocery buyers.
India
- FSSAI registration is mandatory for any commercial sale of food in India. Basic registration is ₹100/year for businesses under ₹12 lakh annual turnover; State License is ₹2,000–5,000/year for medium operations.
- Shop and Establishment license from local municipality if operating from a commercial address.
- GST registration if turnover exceeds ₹40 lakh annually.
- Trade license from local municipal corporation.
United Kingdom and EU
- Register with your local Environmental Health Office as a food business at least 28 days before trading.
- Comply with EU/UK General Food Law for traceability and labeling.
- Allergen labeling rules apply if microgreens are sold in mixes that may contain mustard, celery, or similar allergens.
- HACCP-based food safety plan recommended for any business selling to retail.
Canada and Australia
- Canada — Canadian Food Inspection Agency (CFIA) Safe Food for Canadians Regulations (SFCR) apply to interprovincial sales. Provincial rules govern local sales.
- Australia — Register with your state food authority; comply with Food Standards Australia New Zealand (FSANZ) Code.
Challenges and Hurdles
Microgreens are an attractive business on paper, but most growers who quit do so for predictable reasons. Understanding these hurdles before starting is the difference between a sustainable operation and an expensive lesson.
1. Mold, Damping-Off, and Contamination
Fungal problems are the number-one cause of lost trays for beginners. Damping-off (a soil-borne pathogen that wilts seedlings at the soil line), gray mold (botrytis), and white fuzz on stems all stem from the same root causes: too much moisture, too little airflow, dirty equipment, and overcrowded trays. Solutions:
- Run a small fan 24/7 in the grow area.
- Switch to bottom-watering after germination.
- Sanitize all trays, tools, and surfaces with 1% hydrogen peroxide or food-safe sanitizer between batches.
- Use a moderate seeding density — do not overcrowd. Crowded canopies trap moisture.
- Source clean seeds from reputable microgreen suppliers; cheap bulk seeds often carry pathogens.
2. Unpredictable Demand
A restaurant that ordered 10 lb/week last month might cut to 4 lb next month or pause entirely during slow seasons. Farmers' market traffic is weather-dependent. Mistakes that bite growers:
- Over-relying on one account — one restaurant should never be more than 25% of revenue.
- Not maintaining a pipeline — always have 2–3 prospects in conversation.
- Producing on a fixed schedule regardless of confirmed orders.
The fix is a rolling 3–4 week schedule tied to actual orders plus a small buffer (10–15% over-production for walk-up market sales).
3. Labor and Burnout
Microgreens are not passive income. Seeding, watering, harvesting, packaging, deliveries, market days, and admin all take time. A 40-tray-per-week operation typically requires 12–18 hours of focused work weekly. At 150+ trays/week, it becomes a full-time job. Many growers underestimate this and burn out within 12–18 months. Solutions:
- Batch tasks — all seeding on Monday, all packaging on Friday morning, deliveries on a single route.
- Standardize seeding amounts, watering volumes, and harvest cuts so they can be delegated.
- Plan a hire (part-time, 8–12 hours/week) before you need one, ideally when revenue passes $3,000/month.
4. Compliance Surprises
Many growers don't realize compliance rules apply until a buyer asks for paperwork. Restaurants increasingly request a Certificate of Insurance and food handler license before adding a new supplier. Get licensing in place before your second or third sales conversation.
5. Seasonal Volatility
Demand swings with restaurant slow seasons (post-holiday January–February in the US, monsoon in India, summer holidays in Europe). Smart growers diversify: pair restaurant accounts with farmers' market sales (different seasons), or offer a winter subscription box for direct consumers when restaurant demand dips.
6. Margin Pressure From Cheap Imitators
As microgreens have gone mainstream, large hydroponic operations have entered the wholesale market at lower prices. Small growers cannot compete on price alone. The defensible position is freshness (cut within 24 hours of delivery), variety (offering 15+ SKUs vs the 3–4 a big operation runs), and direct chef relationships.
7. Disease Outbreaks and Recall Risk
A single contaminated batch can damage a brand permanently. Microgreens have a lower outbreak rate than sprouts, but the risk exists. Mitigation: source seeds from FSMA-compliant suppliers, sanitize obsessively, batch-tag every harvest with date and seed lot, and carry product liability insurance from day one.
Frequently Asked Questions
What are microgreens and how are they different from sprouts or baby greens?
Microgreens are young vegetable or herb seedlings harvested 7–21 days after germination, once the first true leaves appear. Unlike sprouts (eaten whole with the seed and root, grown without soil), microgreens are grown in a medium and only the stem and leaves are cut. Unlike baby greens (harvested at 3–4 weeks with developed leaves), microgreens are smaller, more concentrated in flavor, and typically pack 4–40 times more nutrients than their mature counterparts.
What is the most profitable microgreen to grow?
Pea shoots, sunflower, radish, and broccoli microgreens are the top profit performers because they grow fast (8–12 days), have high yield per tray (300–500g), and are in steady demand from restaurants. Specialty varieties like wasabi, popcorn shoots, and amaranth command premium prices ($40–60 per pound) but have smaller markets. A 10x20 tray of pea shoots typically returns $20–40 in revenue against $2–4 in input cost.
How much can you earn from a microgreens business?
A home-based microgreens operation running 50 trays per week can gross $1,500–3,000 monthly after 6–12 months of building a customer base. Scaled commercial operations (200+ trays/week) report $8,000–25,000 monthly revenue. Margins typically run 60–75% after seeds, soil, and packaging. Restaurant accounts and farmers' markets are the two highest-margin channels; wholesale to grocery is volume-heavy with lower margins.
How much space do I need to start a microgreens business?
You can start with just 40–80 square feet — enough for two 4-shelf racks holding 40 trays. A spare room, garage corner, or basement works. Scaling to 200–400 trays per week needs 200–400 sq ft with proper ventilation, climate control, and a clean processing area. The key requirement is not size but environmental control: 65–75°F, 40–60% humidity, and consistent grow lighting.
Do I need a license or food permit to sell microgreens?
Requirements vary by country and state. In most US states, selling at farmers' markets falls under cottage food laws with minimal licensing, but selling to restaurants or retail usually requires a state-issued food handler license, a registered commercial kitchen or grow space inspection, and product liability insurance ($500–1,500/year). In India, FSSAI registration is needed for any commercial food sale. Always check your local agriculture and health department rules before scaling.
What is the shelf life of microgreens after harvest?
Properly harvested and refrigerated microgreens last 7–14 days at 35–40°F (2–4°C). The key factors are dryness at harvest (wet greens rot quickly), clean cutting tools, and breathable but humidity-controlled packaging like clamshells or vented bags. Living microgreens (sold with the tray) last 2–3 weeks since the customer harvests just before use.
Are microgreens really healthier than mature vegetables?
Research from the USDA and University of Maryland shows microgreens contain 4–40 times more nutrients by weight than mature vegetables of the same species. Red cabbage microgreens have 40x more vitamin E, cilantro microgreens have 3x more beta-carotene, and broccoli microgreens contain 100x more sulforaphane (a key anticancer compound) than mature broccoli. They are not meant as a calorie source but as a nutrient density booster.
Can I grow microgreens without soil or grow lights?
Yes. Coco coir, hemp mats, and burlap are common soilless mediums that work well for hydroponic-style microgreens production. For light, a south-facing windowsill provides enough light for personal use but commercial operations need T5 fluorescent or LED grow lights for consistent yields. Without supplemental lighting, growth slows and stems become leggy and pale.
What are the biggest challenges in running a microgreens business?
The top three hurdles are mold and contamination control (poor airflow and over-watering kill batches), unstable demand (restaurants pause orders, market sales fluctuate), and labor intensity (seeding, watering, harvesting, packaging is daily work with no off-days). Successful growers solve these with strict sanitation protocols, diversified customer channels (restaurants + market + direct delivery), and systems that batch operations efficiently.
How long does it take to grow microgreens from seed to harvest?
Most microgreens are harvest-ready in 7–14 days from seeding. Fast crops like radish, pea, and sunflower mature in 7–10 days. Medium crops like broccoli, kale, and cabbage take 10–14 days. Slower varieties like cilantro, basil, and beet can take 18–25 days. The full cycle from soaking seeds to packaged product runs about 9–16 days for most popular varieties.
Final Recommendations
Microgreens reward patience and consistency far more than ambition. Most growers who succeed do so by mastering 3–4 varieties first, building 2–3 reliable accounts, and scaling only after their systems are tight. Most growers who fail do so by trying to launch with 12 varieties and 6 sales channels before they have run a single mold-free month.
If you want to eat better: start with one tray of broccoli or radish microgreens on a kitchen counter under a $30 grow light. Within 10 days you will have a fresher, more nutrient-dense version of food you already eat, at a fraction of the store price.
If you want a side income: aim for one restaurant account by month 4 and one farmers' market booth by month 6. This realistic pace gives time to iron out growing problems and avoids the burnout that comes from over-committing on day one.
If you want a full-time business: plan a 12–18 month runway. Months 1–4 are practice and licensing. Months 4–8 are first customers and process. Months 8–18 are scaling production, optimizing routes, and hiring. Operations grossing $15,000+ monthly almost universally take at least a year of focused work to build.
The microgreens market in 2026 is bigger, more competitive, and more professionalized than it was five years ago. That is a feature, not a bug — it means buyers are educated, distribution channels exist, and the path forward is clearer than ever. The single biggest predictor of success is not capital, location, or variety selection. It is the willingness to show up every week, water trays at the same time, harvest cleanly, and deliver consistently. Do that for a year and you will have a business worth running.