25 Trendy Indian Bridal Hairstyles
By Jaspal Singh
Most of the bride-to-be frets over two things; the bridal makeup and her hairstyle. When it comes to hairstyle, there are so many options that she gets overwhelmed. It is vital that the hairstyle should match her face cut, dress and accessories. To help you make a choice, we share fresh and trendy Indian bridal hairstyles for short, long and medium hair in this article. Check out our collection and pick the one for your big day that will make everyone go gaga.
 If you have an oval face, a long neck and medium to long hair the best hairstyle for you will be two side puff and a neat hairdo at the back.
Things Needed
If you have an oval face, a long neck and medium to long hair the best hairstyle for you will be two side puff and a neat hairdo at the back.
Things Needed
 If you are a south Indian bride, you must be looking for a braided hairstyle that pairs well with heavy silk sarees. Loose romantic braid is simple twisted braid style that does not require any hairspray or curling and will give you a fresh but perfect south Indian bridal look.
Things Needed
If you are a south Indian bride, you must be looking for a braided hairstyle that pairs well with heavy silk sarees. Loose romantic braid is simple twisted braid style that does not require any hairspray or curling and will give you a fresh but perfect south Indian bridal look.
Things Needed
 If you want an intricate style, you may take help of hair extensions.
Things Needed
If you want an intricate style, you may take help of hair extensions.
Things Needed
 If you have a medium or short hair and you want a sophisticated look, then simple low bun decorated with flowers will be best for you. If you have enough hair to make proof at head crown it's right, or else you may need backcombing or teasing, or you can use bumpit.
Things Needed
If you have a medium or short hair and you want a sophisticated look, then simple low bun decorated with flowers will be best for you. If you have enough hair to make proof at head crown it's right, or else you may need backcombing or teasing, or you can use bumpit.
Things Needed
 It is the most simple hairstyle yet adds drama with a beautiful mattha patti.
Things Needed
It is the most simple hairstyle yet adds drama with a beautiful mattha patti.
Things Needed
 Again this is a beautiful bridal hairstyle for girls with short hairs. Styling short hair for a wedding is no more a challenge. You have to curl them, pin them and decorate with a fancy clip (floral or jewel-encrusted clip). This hairstyle gonna give you an exquisite look.
Things Needed
Again this is a beautiful bridal hairstyle for girls with short hairs. Styling short hair for a wedding is no more a challenge. You have to curl them, pin them and decorate with a fancy clip (floral or jewel-encrusted clip). This hairstyle gonna give you an exquisite look.
Things Needed
 Indian brides adorn wearing dupatta over their head. So hair needs to be done in accordance. Now if you have long hairs, make sure to show off. Go with a high puff, with a middle partition in front and wave look of your long hairs. Dupatta can be firmly pinned over the high bun, and a mang tikka finishes the look.
Things Needed
Indian brides adorn wearing dupatta over their head. So hair needs to be done in accordance. Now if you have long hairs, make sure to show off. Go with a high puff, with a middle partition in front and wave look of your long hairs. Dupatta can be firmly pinned over the high bun, and a mang tikka finishes the look.
Things Needed
 If you are a Rajputi bride or wearing Rajputi attire on your wedding day, you need a hairstyle that will top with Rajasthani mattha patti or maang Patti. The voluminous and messy side bun goes perfectly with Rajputi bridal gotta patti dress and antique jewellery.
Things Needed
If you are a Rajputi bride or wearing Rajputi attire on your wedding day, you need a hairstyle that will top with Rajasthani mattha patti or maang Patti. The voluminous and messy side bun goes perfectly with Rajputi bridal gotta patti dress and antique jewellery.
Things Needed
 With a swoop hairdo add drama to your big day. Add volume to the bangs and pin them to the back creating dramatic swoops and then braid your hair to achieve gorgeous, stunning look.
Things Needed
With a swoop hairdo add drama to your big day. Add volume to the bangs and pin them to the back creating dramatic swoops and then braid your hair to achieve gorgeous, stunning look.
Things Needed
 Redefine bridal hairstyle wearing a floral dupatta. Tuck your hair with fresh flower dupatta to give an unconventional but refreshing look. We are sure you will fall in love with it. Floral dupatta will go well with a mid-level ponytail.
Things Needed
Redefine bridal hairstyle wearing a floral dupatta. Tuck your hair with fresh flower dupatta to give an unconventional but refreshing look. We are sure you will fall in love with it. Floral dupatta will go well with a mid-level ponytail.
Things Needed
 Floral hairstyles are evergreen and most appreciated. A simple braid can make heads turn with a few curls and when decorated with some artificial flowers.
Things Needed
Floral hairstyles are evergreen and most appreciated. A simple braid can make heads turn with a few curls and when decorated with some artificial flowers.
Things Needed
 Transform basic hairstyle into something incredible with the help of a simple bumpit and tucking veil.
Things Needed
Transform basic hairstyle into something incredible with the help of a simple bumpit and tucking veil.
Things Needed
 Instead of wearing traditional red lehenga, if want to go for neutral and classy tone, a sleek twisted bun is the hairstyle to match your attire. Also, it will direct attention to the designer dress you will be wearing.
Things Needed
Instead of wearing traditional red lehenga, if want to go for neutral and classy tone, a sleek twisted bun is the hairstyle to match your attire. Also, it will direct attention to the designer dress you will be wearing.
Things Needed
 If you have long and coloured hair, create a floral fishtail braid.
Things Needed
If you have long and coloured hair, create a floral fishtail braid.
Things Needed
 If you are wearing a gown or indo-western on your wedding day loose braid updo will create a super pretty look. If you are wearing a lehenga, still you may try this beautiful hairstyle. If you need to cover your head, you may try veil instead of dupatta.
Things Needed
If you are wearing a gown or indo-western on your wedding day loose braid updo will create a super pretty look. If you are wearing a lehenga, still you may try this beautiful hairstyle. If you need to cover your head, you may try veil instead of dupatta.
Things Needed
 For a different yet graceful look with your red or maroon traditional bridal lehnga add drama to simple donut bun.
Things Needed
For a different yet graceful look with your red or maroon traditional bridal lehnga add drama to simple donut bun.
Things Needed
 An Indian bridal outfit seems to be incomplete without a gajra or mogra garland.
Things Needed
An Indian bridal outfit seems to be incomplete without a gajra or mogra garland.
Things Needed
 Gajra adorned bun glimpsing through net chunni will make you feel like a princess and no doubt every bride wants to look like a princess on her big day.
Things Needed
Gajra adorned bun glimpsing through net chunni will make you feel like a princess and no doubt every bride wants to look like a princess on her big day.
Things Needed
 Create a floral hair swag with flower braid that gels well with Indo-westerns gowns.
Things Needed
Create a floral hair swag with flower braid that gels well with Indo-westerns gowns.
Things Needed
 Beautiful and straightforward hairstyle with the designer outfit and jewellery will bring every eye to focus on you.
Things Needed
Beautiful and straightforward hairstyle with the designer outfit and jewellery will bring every eye to focus on you.
Things Needed
 If you have layered haircut go with shaggy faux bob.
Things Needed
If you have layered haircut go with shaggy faux bob.
Things Needed
 Ringlet bun looks elegant and can be accessorised with a beautiful fancy comb of your choice.
Things Needed
Ringlet bun looks elegant and can be accessorised with a beautiful fancy comb of your choice.
Things Needed
 At the side of the front first puff is made and then on the crown, the second puff is placed. A neat bun is created at the back of the head in the slightly inverted way. Floral accessory touching the neck finished the bridal look.
Things Needed
At the side of the front first puff is made and then on the crown, the second puff is placed. A neat bun is created at the back of the head in the slightly inverted way. Floral accessory touching the neck finished the bridal look.
Things Needed
 Go romantic with cute french twisted bun decorated with flower lining.
Things Needed
Go romantic with cute french twisted bun decorated with flower lining.
Things Needed
 This hairstyle will give you a perfect bridal look.
Things Needed
This hairstyle will give you a perfect bridal look.
Things Needed
Indian Bridal Hairstyles
1. Simple both side hair puff with neat hair updo
If you have an oval face, a long neck and medium to long hair the best hairstyle for you will be two side puff and a neat hairdo at the back.
Things Needed
- Texturizing hairspray
- Bobby pins
- Maang patti
- Wash, dry your hair and apply texturizing
- Part the front of your hair into two sections from the
- Take hair on one side twist and make a high side puff. Secure the puff with bobby pins
- Repeat the previous step on the other side.
- Gather all the hair and create a neat hair updo covering back of your head.
- Wear a maang patti to complete the look.
2. Loose romantic braid
If you are a south Indian bride, you must be looking for a braided hairstyle that pairs well with heavy silk sarees. Loose romantic braid is simple twisted braid style that does not require any hairspray or curling and will give you a fresh but perfect south Indian bridal look.
Things Needed
- Hair Elastic
- Maang Tika
- Hair elastic
- Spritz a little amount of texturizing gel all over your hair.
- Part all your hair on one side and flip your hair over the shoulder.
- From the side of parting, pick a chunk of hair near the top and divide it into two sections.
- French twist the sections. Intertwin them with each other and keep on adding more hair from the side of your forehead into the twisted
- When the French twist reaches your neck nape, divide all your hair into three sections and braid till the end.
- With the help of hair elastic secure the end of the
- To make the braid look softer loosen it.
- To finish the look put on the Mang Tikka.
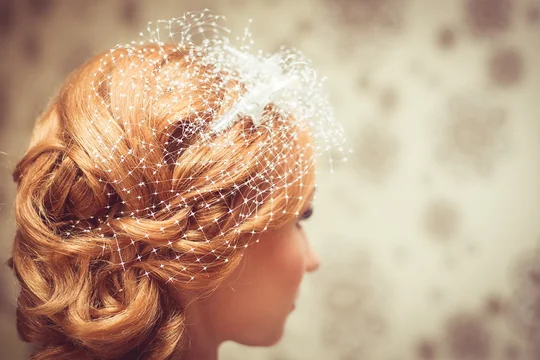
3. Crown Braid Side Bun
If you want an intricate style, you may take help of hair extensions.
Things Needed
- Texturizing spray
- Bumpit
- Hair donut
- Hair extensions
- Hair elastic
- U pins
- Bobby pins
- Strong hold hairspray
- Wash your hair, dry them and apply some texturizing
- Part hair on one side
- At the crown of your head under your hair insert a bumpit.
- Pick hair from the front of the side with more hair, twist them, swoop back and pin them on the side.
- Also, pin back the hair on another side.
- Braid hair extensions. With a hair elastic secure their end.
- Now place the braided extension on the front of the bumpit along the crown on your head and secure it using U pins.
- Tie all your hair to make a low side ponytail and at the base of the ponytail insert a hair donut.
- From your ponytail pick 1 inch section at a time. Roll them loosely, and with the help of bobby pins secure to the hair doughnut until hair donut is hidden from the view.
- Spritz hairspray to hold your hairstyle.
4. Low bun bouquet hairstyle for short hair
If you have a medium or short hair and you want a sophisticated look, then simple low bun decorated with flowers will be best for you. If you have enough hair to make proof at head crown it's right, or else you may need backcombing or teasing, or you can use bumpit.
Things Needed
- Hair elastic
- Bumpit
- U pins
- Bobby pins
- 5-6 Roses (White, pink, Red, yellow depending on your outfit colour)
- MangTikka
- Part your hair.
- Leave side bangs and tie rest of your hair into a ponytail with an elastic band.
- Depending on how short your hair is, loop the ponytail through 1-2 times to make a chignon bun. Secure bun with bobby pins.
- With the help of your fingers spread chignon bun into a fan shape.
- Swoop the side bangs and bring them to join bun. Secure side bangs with the help of bobby pins.
- Top the hairstyle with roses with the help of U pins.
- To complete the hairstyle, a mang tikka runs along the middle parting at the front.
5. Two sides puff and curly bump
It is the most simple hairstyle yet adds drama with a beautiful mattha patti.
Things Needed
- Heat Protectant
- Bobby pins
- Strong hold hairspray
- Hair curler
- Apply a heat protectant to wash and dried hair.
- Curl all your hair with a 2-inch hair curler
- Part your front hair from the middle
- Take front hair from one side twist it to make a puff. Secure the puff with a bobby pin on the side. Keep it little high.
- Repeat the previous step on another side.
- Let your curly hair bump at the back and flip over the shoulder to the front from both the sides.
- Wear maang patti.
6. Fancy clip curly bun
Again this is a beautiful bridal hairstyle for girls with short hairs. Styling short hair for a wedding is no more a challenge. You have to curl them, pin them and decorate with a fancy clip (floral or jewel-encrusted clip). This hairstyle gonna give you an exquisite look.
Things Needed
- Heat Protectant
- 1-inch curling iron
- Straightening iron
- Bumpit (medium)
- Bobby pins
- Fine-toothed comb
- Jewel-encrusted or floral clip
- Wash, dry your hair and apply a heat protectant
- Straighten your hair with hair straightening
- Now pick up a just one-inch section of hair at a time and curl all of your lower half hair.
- Part your hair on one side
- At the crown of your head under your hair insert a bumpit
- With the help of fine-toothed comb smoothen the hair down.
- From the front of your right side pick up 2 inches section of hair, twist a few times and pin at the back of your head.
- Repeat the previous step on the left side
- At the back of the head with the help of the hair-clip clip half of your hair in the centre.
- To finish the look and frame your face, pull some curls in the front.
- Curl the side bangs.
7. Beach wave with mang tikka and dupatta
Indian brides adorn wearing dupatta over their head. So hair needs to be done in accordance. Now if you have long hairs, make sure to show off. Go with a high puff, with a middle partition in front and wave look of your long hairs. Dupatta can be firmly pinned over the high bun, and a mang tikka finishes the look.
Things Needed
- Texturizing spray
- Bumpit
- Hair curler
- Heat Protectant
- Strong hold hairspray
- Mang Tikka
- Wash, dry your hair and apply some texturizing spray.
- At the crown of your head under your hair insert a bump and secure it with U pins and bobby pins to make it look like a high bun.
- Part the front section of your hair
- Smooth over the hair at the top of the bumpit and pin in the centre at the back of your head.
- Apply a heat protectant to the length of your hair and make large waves with a curler.
- Spritz strong hold hairspray
- Allow your long hairs to fall off your shoulder in front of both the sides.
- Mang tikka runs along the middle parting at the front.
- Pin dupatta over the high bun
8. Messy side bun
If you are a Rajputi bride or wearing Rajputi attire on your wedding day, you need a hairstyle that will top with Rajasthani mattha patti or maang Patti. The voluminous and messy side bun goes perfectly with Rajputi bridal gotta patti dress and antique jewellery.
Things Needed
- Texturizing spray
- Volumizing mousse
- Fine-toothed comb
- Hair elastic
- Bobby pins
- Rajasthani Maang Patti
- Light hold hairspray
- To the front section of your hair apply volumizing
- Spray Texturizing spray over your hair
- Wear mattha patti
- Part hair to one side
- Make a swoop with the front section of hair with the help of a fine-toothed comb and pin the end of swooped hair to the side of your head.
- With the help of hair elastic tie all your hair and make a low side ponytail.
- Create a messy and loose side bun by twisting and rolling the side ponytail and secure it with the help of bobby pins to your head.
- Spritz hairspray to set the messy side bun at the place.
9. Dramatic Loose brade
With a swoop hairdo add drama to your big day. Add volume to the bangs and pin them to the back creating dramatic swoops and then braid your hair to achieve gorgeous, stunning look.
Things Needed
- Heat Protectant
- Hair elastic
- 2-inch curling iron
- Bobby pins
- Light hold hairspray
- Wash your hair, dry it and apply a heat
- Curl all your hair picking a 2-inch sections at a time.
- Part your hair on one side deeply.
- Pick up your hair at the top, swoop them back and pin to the back of your head.
- In the same manner, pin all the hair at the front of your face but make sure not to sleek them too much.
- Now flip all your hair on one side over the shoulder and make a braid.
- Secure braid with a hair
- For a messy texture lose your hair
- To frame your face pull out a few curls
- Spritz a light hold hairspray
10. Floral Duppata
Redefine bridal hairstyle wearing a floral dupatta. Tuck your hair with fresh flower dupatta to give an unconventional but refreshing look. We are sure you will fall in love with it. Floral dupatta will go well with a mid-level ponytail.
Things Needed
- Heat Protectant
- 2-inch curling iron
- Bumpit
- Hair elastic
- U-pins
- Bobby pins
- Floral dupatta made up of fresh flowers
- Wash, dry your hair and apply a heat
- Curl lower half of your hair picking up just 2-inch sections at a time.
- At the crown of your head insert a bumpit
- Part the front section of your hair
- Smooth over the hair at the top of the bumpit and pin in the middle at the back of your head
- Pin the centre parted front section to the sides of the head
- Tie all your hair into a mid-level ponytail to the back of your head.
- Pin the floral dupatta at the front of the bumpit with the help of U-pins and bobby pins.
11. Simple Floral Braid
Floral hairstyles are evergreen and most appreciated. A simple braid can make heads turn with a few curls and when decorated with some artificial flowers.
Things Needed
- Heat Protectant
- 2-inch curling iron
- Hair elastic
- Bobby pins
- U pins
- Artificial flowers
- After washing and drying, your hair apply a heat
- Curl all your hair picking up 2-inches at a time
- Part hair on the left side or the right side as preferred
- Gather the front sections of your hair and secure them with bobby pins in a haphazard manner on the top of your head.
- Now braid the hair on your side and secure the end with a hair elastic.
- Decorate braid with artificial flowers along its length with the help of U-pins. Better use small flowers.
- Frame your face by pulling out some strands of your front hair.
12. Bumped up curls and veil
Transform basic hairstyle into something incredible with the help of a simple bumpit and tucking veil.
Things Needed
- Heat Protectant
- 1-inch curling iron
- Fine-toothed comb
- Bumpit
- Bobby pins
- Light hold hairspray
- Veil
- Wash, dry your hair and apply a heat
- Curl lower half of the hair by picking up just 1-inch sections at a time.
- At the crown of the head under the hair insert a bumpit.
- Leaving out bangs smooth the hair over top and sides of the bumpit and pin it in the centre of the back of the head.
- Spritz light hold
- Tuck a veil matching with your lehenga or gown over the bumpit.
13. Elegant twisted side bun
Instead of wearing traditional red lehenga, if want to go for neutral and classy tone, a sleek twisted bun is the hairstyle to match your attire. Also, it will direct attention to the designer dress you will be wearing.
Things Needed
- Heat Protectant
- Straightening iron
- Bobby pins
- Hair elastic
- Strong hold hairspray
- After washing and drying, your hair, apply a heat
- Straighten all your hairs with hair straightener by picking up 2-inches of sections at a time.
- Tie all your hair into a low and side ponytail. Make sure to leave out the front chunks of hair.
- From the ponytail pick out a 2-inch section of hair, roll it loosely to make a bun and pin it to the side of your head.
- Now pick another 2-inch section of hair from the ponytail and wrap it loosely around the bun.
- Repeat the above step until and all your hair is rolled into a side bun.
- Part of the section of hair in the front on one side.
- From the side with more hair pick the 2-inch section from right next to the parting and divide into two parts. French twist both the parts, keep on adding more hair with each subsequent twist.
- Once done simple twist the french twist a few times in the end and pin it on the other side crossing the top of the bun.
- Repeat both the above steps on another side as well.
- Spray strong hold hairspray and finish the look.
14. Fishtail braid decorated with flowers
If you have long and coloured hair, create a floral fishtail braid.
Things Needed
- Heat Protectant
- Hair curler
- Bobby pins
- Hair elastic
- Flowers
- First of all wash and dry your hair and apply a heat protectant
- With the help of a hair, curler create soft spiral curves
- Part your hair
- Take hair from the side with more hair (leaving a few chunks) twist it bring it back and pin at the centre of the back of your head with the help of a bobby pin.
- Repeat the same on the other side.
- Divide the hair at the back into two piles. Hold both the part of hair in both your hands separately.
- Take a small section of hair from your left hand and cross it over the hair piled in the right hand.
- Repeat the previous step with hair in the right hand to create an X-shape in the centre.
- Repeat the above steps until you reach hair end.
- Secure the end with an elastic band.
- Decorate braid with flowers using bobby pins.
- Curl or straighten the chunks of hair in the front to frame your face
15. Loose braid updo
If you are wearing a gown or indo-western on your wedding day loose braid updo will create a super pretty look. If you are wearing a lehenga, still you may try this beautiful hairstyle. If you need to cover your head, you may try veil instead of dupatta.
Things Needed
- Hair protectant
- 1-inch hair curler
- Hair elastic
- Bobby pins
- Strong and light hold hairspray
- Fancy hair clip
- Apply heat protectant and curl your entire hair with a 1-inch curling iron.
- Keeping front bangs aside divide rest of the hair into four sections.
- With the help of a bumpit tease the crown area of your head to the desired height.
- Smooth the crown area nicely and pin the hair at the back.
- Spray light hold hairspray over the crown area.
- Taking 2-inch hair section on the back of your head at a time, roll all your hair and pin towards the centre.
- Leaving a few chunks of front hair and french braid the top right section of hair. Secure it with an elastic band.
- Repeat the same on another side.
- Pin both right and left french braids on the back of head keeping them hidden under the rest of the pinned hair.
- Apply strong-hold hairspray.
- Decorate with a fancy floral or jewelled hair pin.
16. Dramatic centre-parted bun with maang tikka or matha Patti
For a different yet graceful look with your red or maroon traditional bridal lehnga add drama to simple donut bun.
Things Needed
- Texturizing spray
- Hair donut (big)
- U pins
- Hair elastic
- Bobby pins
- Smoothening serum
- Fine-toothed comb
- Strong hold hairspray
- After washing and drying, your hair, apply some texturizing spray.
- Part your hair from middle and tie all your hair in a high ponytail.
- On to the base of the super high ponytail insert a hair donut.
- Roll the hair donut to the entire length of your ponytail leaving a section of hair in the middle. Simultaneously keeps on wrapping the hair around the donut.
- Pin the donut at a place once it reaches the base of the ponytail with the help of Upins.
- Divide the left out middle section into many thin sections.
- Picking individual sections, roll them to form ringlets and pin them onto the bun.
- With the help of a fine-toothed comb create volume by inserting the tail of comb under the centre-parted hair.
- To get rid of frizzy look spread the smoothing serum over the fine-toothed comb and run it through the hair at the front.
- Spray strong hold hairspray
- Finish the look with maang tikka or mattha Patti.
17. Traditional mogra braid
An Indian bridal outfit seems to be incomplete without a gajra or mogra garland.
Things Needed
- Texturizing spray
- Bobby pins
- Bumpit
- Hair elastic
- Long gajra
- Maang tikka
- Apply a texturizing spray to your washed and dried hair
- Part hair from the middle.
- At the crown of head insert a bumpit under the hair and smoothen the hair over the bumpit.
- Pick chunk of hair from the right side, twist it and pin at the back of the head.
- Repeat the same on the other side.
- Divide hair on your back into three sections and make a simple braid.
- If you have short hairs, you may use hair extensions.
- Secure the end of the braid with a hair elastic
- Pin the gajra around the head crown and intertwine it around the entire length of the braid. Secure the end with bobby pins.
- To complete the hairstyle, a mang tikka runs along the middle parting at the front.
18. Gajra adorned bun
Gajra adorned bun glimpsing through net chunni will make you feel like a princess and no doubt every bride wants to look like a princess on her big day.
Things Needed
- Fine-toothed comb
- Hair elastic
- Smoothening serum
- Juda net
- Bobby pins
- Gajra
- U-pins
- Apply Smoothening serum all over your hair
- With a fine-toothed comb, comb all your hair back and tie them into a ponytail at the back of your head. The ponytail should be mid-level.
- Twist, roll the ponytail to make a bun. Secure the bun to head with bobby pins.
- Use juda net to cover the bun.
- Cover the bun with gajra with the help of U-Pins.
- Tuck net chunni at the head crown with the help of bobby pins and U-pins to complete the look.
19. Flowery braid
Create a floral hair swag with flower braid that gels well with Indo-westerns gowns.
Things Needed
- Texturizing spray
- Bobby pins
- Small flowers
- Hair curler
- Hair elastic
- After washing and drying your hair add texture spray.
- Curl all your hair to create soft spirals.
- Leaving front chunks to frame your face grab a portion of hair from the top of your head and make a fresh braid underneath to the right side and not on top. Secure it with a rubber
- Tease the hair around the braid
- Grab a small section of loose hair, twist and pin them underneath the base of the neck.
- Repeat this until small loops of hair cover your head.
- Curl the chunks in front to frame your face.
20. Side swept curls
Beautiful and straightforward hairstyle with the designer outfit and jewellery will bring every eye to focus on you.
Things Needed
- Heat Protectant
- 2-inch curling iron
- Fancy hairpins
- Bobby pins
- Light hold hairspray
- To your washed and dried hair apply hair protectant
- Curl all your hair picking up just 2-inch hair sections at a time.
- Part your hair deeply on one side
- Swoop the hair on the side with more hair to that side and back of your head and pin it.
- Repeat the step on the other side and pin the hair on the back and another side.
- Flip your hair over the shoulder on one side to the front.
- Insert a fancy hair clip
- Spray light hold hairspray and finish the look.
21. Shaggy faux bob
If you have layered haircut go with shaggy faux bob.
Things Needed
- Heat Protectant
- 1-inch hair curling iron
- Hair elastic
- Texturising spray
- Light hold hairspray
- Wash your hair, dry it and apply a heat protectant
- Curl all your hair picking up 1-inch sections at a time.
- Part your hair down from middle roughly.
- Leave the short front layer of hair and gather rest of hair to back and make a simple and loose braid.
- Spritz texturizing hair all over the front layer of hair and mess it with your hands to get a faux bob look.
22. Side Parted Ringlet Bun
Ringlet bun looks elegant and can be accessorised with a beautiful fancy comb of your choice.
Things Needed
- Hairbrush
- Straightening iron
- 3/4th-inch curling iron
- Heat Protectant
- Texturizing spray
- Hair elastic
- Bobby pins
- Strong hold hairspray
- Fancy hair comb
- The first step is always to wash your hair, dry them and brush out all the tangles and knots
- Apply some heat protectant to your hair
- With the help of hair straightening, straighten the front section of your hair and then section it off.
- Tie the hair at your back into a Make sure the ponytail is mid-level.
- Pick up one-inch sections of your hair in the ponytail at a time and curl all the hair in the ponytail.
- To maintain the curls spray the texturizing spray on the curls.
- From your ponytail pick one curl, roll it to make a ringlet and pin into your head at the base of the ponytail.
- Repeat the previous step until all hair in the ponytail is rolled and pinned.
- Part of the front section on one side
- Repeat the above step on the other side of the parting
- Pick hair from one side parting, swoop it back and pin above the bun.
- Repeat the above step on another side of the
- Accessorize bun with a hair comb
- To set the bun in its place use hairspray in good quantity.
23. Double puff bun decorated with Flowers
At the side of the front first puff is made and then on the crown, the second puff is placed. A neat bun is created at the back of the head in the slightly inverted way. Floral accessory touching the neck finished the bridal look.
Things Needed
- Head protectant
- Hair straightener
- Bobby pins
- Bumpit
- Hair elastic
- Floral accessories
- Light hold hairspray
- After washing and drying, your hair apply a heat
- With the help of hair straightener, straighten all your hair.
- Part your front hair on one side.
- Insert bumpit at the head crown to make a puff, or you may make the puff by backcombing.
- Smooth the crown area.
- Take the front hair on the side with more hair, twist it and make a side puff. Secure the puff with bobby pins at the side and back.
- Collect all the hair at the back and make a medium height ponytail with the help of a hair elastic.
- Roll the ponytail inverted and make it rest over the hair elastic. Secure the bun with bobby pins.
- Finish the look with floral accessories below the bun touching your neck.
- Spritz light hold hairspray.
24. French Twist Bun
Go romantic with cute french twisted bun decorated with flower lining.
Things Needed
- Heat Protectant
- 3/4th-inch curling iron
- Texturizing spray
- Hair elastic
- Fresh flowers
- Bobby pins
- U pins
- Strong hold hairspray
- After washing and drying, your hair apply a heat
- Curl all your hair picking up only 1-inch section at a
- To give your hair hold apply some texturizing spray.
- Part your hair from front down to the middle.
- From left next to right side of the parting pick up 2- inch section of your hair and split them into 2.
- French twist hair by intertwining the sections with one another and keep on adding more hair from side with each subsequent twist.
- Pin the French twist with bobby pins when it reaches the back of your head
- Repeat the above two steps on another side
- Tie all hair into a low ponytail
- Make a low bun by rolling and twisting the ponytail and secure the bun to head with bobby pins.
- Decorate French twist and bun with flowers.
- Spritz strong-hold
25. Crown puff with high bun
This hairstyle will give you a perfect bridal look.
Things Needed
- Texturizing hair spray
- Bobby pins
- Strong hold hairspray
- Hair decorating beads
- After washing and drying hair apply texturizing spary.
- Back comb your and create a high crown puff.
- Spritz strong hold hairspray.
- Make roll bun covering back of your head
- Decorate bun with pearl beads.