9 Lesser Known Features of Kindle Fire
By Jaspal Singh

Amazon’s popular tablet has several restrictions and omissions. Today, we reveal how to unlock its hidden features and use the device to its full potential.
Kindle Fire was first announced in 2011, since then more than 7 million units have been sold. Its main features are 7 inch screen with IPS technology and OS called Fire OS which is based on Google's Android operating system with customised version.
The price has been falling and other features are upgraded regularly, in Sept 2013 its priced at $139 only. Kindle Fire is the second best table after Apple's iPad.
NOTE: Tips apply to both versions of Kindle Fire 7, unless otherwise stated
 One of the most common complaints about the Kindle Fire is that Silk, the built in browser, doesn't support Flash. However, there is a simple workaround that allows you to watch Flash videos on YouTube and view Flash content on some other web pages. All you need to do is switch from the Desktop version of the website to the mobile one. You can do this for individual sites by typing m instead of www when you enter the web address into Silk. For YouTube, for example, it’s m.youtube.com.
To always view the mobile version of a site, tap the Menu icon at the bottom of the browser, go to Settings, ‘Requested website view’ and select Mobile. Be aware, though, that changing this setting may prevent you from using certain features on sites such as Facebook.
One of the most common complaints about the Kindle Fire is that Silk, the built in browser, doesn't support Flash. However, there is a simple workaround that allows you to watch Flash videos on YouTube and view Flash content on some other web pages. All you need to do is switch from the Desktop version of the website to the mobile one. You can do this for individual sites by typing m instead of www when you enter the web address into Silk. For YouTube, for example, it’s m.youtube.com.
To always view the mobile version of a site, tap the Menu icon at the bottom of the browser, go to Settings, ‘Requested website view’ and select Mobile. Be aware, though, that changing this setting may prevent you from using certain features on sites such as Facebook.
 Although the Kindle Fire HD has a built-in camera, this is intended solely for use as a web-cam with the Skype app, rather than for taking photos. To unlock the camera, you’ll need to install an app, such as Photo Editor. Available to download for free from the Amazon Appstore, this lets you take photos with your Kindle Fire‘s camera, then edit and share them afterwards. The tricky part is positioning your device correctly, because the front-facing camera means you can't preview shots before you take them.
 You can now browse app stores such as the brilliant 1mobile, Slide Me and GetJar, and grab whatever free apps you want. For example, you could download an alternative browser to Silk and install Flash Player. There’s also a way to get the Google Play store on your Kindle Fire, but it involves rooting your device, which is risky. You can find instructions at Android Authority.
 One of the most glaring omissions on the Kindle Fire is a calculator, which you'd expect to find on any smartphone or tablet. Fortunately, there are some great free calculator apps in the Amazon Appstore, of which our favourite is Calculator Plus Free. This looks just like a real calculator, with big keys and an easy-to-read display. It also remembers every calculation you make.
1. Turn off special offers and recommendations
When your Kindle Fire is in portrait (vertical) mode, it displays Home Recommendations on the home screen. These suggest items you might like to buy, based on purchases made by other users. lf you find this pushy and distracting, turn off the feature by swiping down from the top of the screen to access the Settings menu. Choose More, Applications, Amazon Home Recommendations and select Hide. You can also stop Special Offers appearing on your Kindle Fire, but it will cost you £10 to unsubscribe. Go to Amazon’s ‘Special Offers for Kindle' page', click ‘contacting Customer Service’ and log into your account. Click the Kindle option at the top of the page and complete the online form.2. Watch Flash YouTube videos in your browser
One of the most common complaints about the Kindle Fire is that Silk, the built in browser, doesn't support Flash. However, there is a simple workaround that allows you to watch Flash videos on YouTube and view Flash content on some other web pages. All you need to do is switch from the Desktop version of the website to the mobile one. You can do this for individual sites by typing m instead of www when you enter the web address into Silk. For YouTube, for example, it’s m.youtube.com.
To always view the mobile version of a site, tap the Menu icon at the bottom of the browser, go to Settings, ‘Requested website view’ and select Mobile. Be aware, though, that changing this setting may prevent you from using certain features on sites such as Facebook.
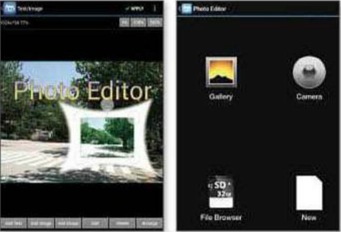
3. Unlock your kindle fire HD's hidden camera
Although the Kindle Fire HD has a built-in camera, this is intended solely for use as a web-cam with the Skype app, rather than for taking photos. To unlock the camera, you’ll need to install an app, such as Photo Editor. Available to download for free from the Amazon Appstore, this lets you take photos with your Kindle Fire‘s camera, then edit and share them afterwards. The tricky part is positioning your device correctly, because the front-facing camera means you can't preview shots before you take them.
4. Install apps from outside the Amazon Appstore
With Google Play offering nearly one million apps, the Amazon Appstore’s selection of around 20,000 looks rather limited. Fortunately, you can hack your Kindle Fire to install apps from other sources and beat Amazon’s restricted version of Android. Open the Settings menu on the home screen, choose More, Device and turn on the option ‘Allow Installation of Applications From Unknown Sources'. Next, get Easy Installer from the Amazon Appstore, to help you find and install the apps you download.
You can now browse app stores such as the brilliant 1mobile, Slide Me and GetJar, and grab whatever free apps you want. For example, you could download an alternative browser to Silk and install Flash Player. There’s also a way to get the Google Play store on your Kindle Fire, but it involves rooting your device, which is risky. You can find instructions at Android Authority.
5. Extend or reduce your screen timeout
Your Kindle Fire automatically turns off its screen and goes into standby mode when you haven`t touched it for a while. If you find this time too short, you can easily extend it or, if you’re trying to conserve battery life, you can reduce it. Press More in the Settings menu, select Display and tap Screen Timeout. Choose how long you want your Kindle Fire to wait before it goes to sleep, from 30 seconds to one hour. Alternatively, you can select Never so your screen stays on all Wm the time. ` This is "W useful if you’re V watching a " film or reading a book and don’t want your device to turn off. However, to prevent battery drain, the Never option is probably best used only when your Kindle Fire is charging.6. Prevent unauthorised purchases
Because the Kindle Fire makes it so easy to buy apps, books, films and other downloads from Amazon, there's a danger that someone using your device could run up a huge bill in your name. To stop this happening, you should turn on the built-in parental controls, which restrict access to individual content libraries (such as Books, Apps and Music), the Silk browser, and even your Wi-Fi connection, as well as preventing purchases from the Amazon store. From the Settings menu, press More and choose Parental Controls. Select ‘create a Parental Controls Password‘, enter the login you want to use and tap Finish. On the next screen, set Parental Controls to On, select ‘Block and Unblock Content Types’ and choose what you want to block. You can give children controlled access to web content using an app called Kindle FreeTime, which you'll find in the Apps library of your Kindle Fire. FreeTime lets you create profiles for your kids, decide which downloads they can access and set daily time limits for how long they can spend on your device.7. Keep your Kindle Fire private
If you don’t want anyone to see what‘s on your Kindle Fire, you can password- protect the whole device. Go to Settings, More, Security, turn on Lock Screen Password and enter a PIN code. You can also prevent people from viewing the sites you've visited in Silk. Tap the Menu icon at the bottom of the browser, select History and press Clear All. Alternatively, select Settings from the Menu and choose specific items to delete, such as cookies, passwords and online-form data. To stop your real first name appearing in the top-left corner of your screen, go to the Kindle section of the Amazon website, choose Manage Your kindle, Manage Your Devices and click Edit next to the name of your Kindle Fire. Enter a new name and click Update.8. Take screenshots on your Kindle Fire HD
As with most recent Android devices, such as the Nexus 7, it`s easy to capture screen grabs on your Kindle Fire HD. Just hold down the power and volume- down buttons on top of the device (or on the right, if you're in landscape mode), to take a snapshot of what‘s on the screen. To browse your captured images, scroll your home-screen menu options to the left, press Photos and open the folder called Screenshots. If you want to copy the grabs to your PC, connect your Kindle Fire to your computer and browse to the folder Computer\Kindle\internal storage\Pictures\Screenshots. You can't take screenshots on the non-HD Kindle Fire.9. Add a calculator to your device
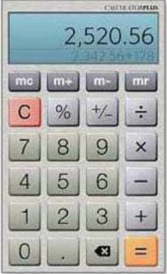
One of the most glaring omissions on the Kindle Fire is a calculator, which you'd expect to find on any smartphone or tablet. Fortunately, there are some great free calculator apps in the Amazon Appstore, of which our favourite is Calculator Plus Free. This looks just like a real calculator, with big keys and an easy-to-read display. It also remembers every calculation you make.